Create a new file and save it as Impeller_hexa-nut
Click the polygon icon from the toolbar
Create a hexagon with each side measuring 0.28685 inches and constructed at the origin
Extrude the hexagon by 0.125 inches
The figure of the model is shown below.
Choose INSERT → DESIGN FEATURE → SPHERE
Choose CENTER, DIAMETER
Enter the diameter value 0.57 inches
Enter the Point Constructor values as follows
Axes XC YC ZC
Dimension 0.0 0.0 0.125
In the Boolean operations dialog box select INTERSECT
The model will look like the following.
We will now use a Mirror command.

Choose EDIT → TRANSFORM
Select the model and click OK
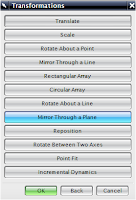
Click MIRROR THROUGH A PLANE
Click on the flat side of the model as shown. Be careful not to select any edges
Click on OK
Click on COPY
Click CANCEL
You will get the following model.
Choose INSERT → COMBINE BODIES → UNITE
Select the two halves and Unite them
Insert a cylinder with the vector pointing in the Z-direction
and with the following dimensions.
Diameter = 0.25 inches
Height = 1 inch
Center the cylinder on the origin and subtract this cylinder
from the hexagon nut
Now, we will chamfer the inside edges of the nut.
Choose INSERT → DETAIL FEATURE → CHAMFER
Select the two inner edges as shown and click OK
Enter the Chamfer Offset Diameter as 0.0436 inches and click OK
You will see the chamfer on the nut. Save the model.


ReplyDeleteThanks for providing this information was of great help for my needs, Keep posting content related to hex nut manufacturers
This comment has been removed by the author.
ReplyDelete