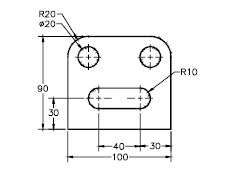
The following steps are required to complete this tutorial:

a. Start a new part file using the Model template and then draw the profile of the outer loop. Add the required constraints.
b. Draw the inner loops and add the required dimensions to them.
c. Exit the Sketcher environment and invoke the Extrude tool. Define the depth of the extrusion to create the final model.
d. Rotate the view in 3D space.
e. Save the file and close it.
Drawing the Sketch of the Model
The sketch of this model will be created on XC-ZC plane. As mentioned earlier, when you extrude the sketch with nested closed loops, the inner loops are automatically subtracted from the outer sketch.
1. Start a new file using the Model template. Save the file in the C:\NX 6\c04 folder with the name c04tut1.prt.
2. Create three fixed datum planes (YC-ZC, XC-ZC, and XC-YC) and make the display of WCS on.
3. Invoke the Sketcher environment using the XC-ZC plane.
4. Using the Zoom In/Out tool, zoom out such that the sketching plane appears almost half its original size.
5. Draw the sketch of the outer loop and add the required geometric and dimensional constraints to it, as shown in Figure
6. Draw the inner loops and then add the required geometric and dimensional constraints to them, as shown in Figure
Converting the Sketch into the Base Feature
Next, you need to convert the sketch into the base feature. This is done using the Extrude tool.
1. Choose the Finish Sketch button to exit the Sketcher environment; the current view is automatically changed to the Trimetric view.
2. Right-click and choose Fit from the shortcut menu to make sure that the sketch fits in the screen.
3. Invoke the Extrude tool from the Feature toolbar; the Extrude dialog box is
displayed and you are prompted to select the planar face to sketch or select
the section geometry.
4. Select the sketch; the preview of the extruded feature is displayed and the End edit box is displayed on the feature.
5. Enter 45 as the value in the End edit box and press the ENTER key; the preview is modified accordingly.
6. Choose the OK button in the Extrude dialog box; the extrude feature is created and displayed in the drawing window.
7. Using the CTRL+B keys, hide the display of the datum axes, datum plane, and the sketch. The extruded model is shown in Figure
Rotating the View of the Model
Next, you need to rotate the view of the model so that you can maneuver around it and view it from different directions.
1. Choose the Rotate button from the View toolbar to invoke this tool; the cursor changes to the rotate view cursor.
2. Press and hold the left mouse button and drag the cursor in the drawing window to rotate the view of the model.
3. Invoke the Rotate tool again to finish rotating the model.
4. Choose the Isometric button in the View toolbar to restore the Isometric view. If this is not the default button, then choose the down arrow on the right of the default button and choose the Isometric button from the flyout.
5. Right-click in the drawing window and choose Fit from the shortcut menu; the model fits in the drawing window.
Saving and Closing the File
1. Choose File > Close > Save and Close from the menu bar to save and close the file.


No comments:
Post a Comment